I love the Arduino Eco-System. Although I do not really like the IDE, the whole system is awesome. And it allows to quickly prototype ideas. And, as everything is Open Hardware, it also allows you to build your own PCBs with the same components used by Arduino. I am not in the business for creating a large-scale electronics product. But it’s very important for me that I could.
While working on my DIY Home Automation System I noticed some limitations with the current Arduino Hardware Offers. I have created my own Atmel 328p based PCB for my sensor nodes. The Atmel 328p is the MCU that drives Arduino Uno, Nano, Micro Pro, Sparkfuns Redboard and various other Prototype Systems. This MCU is quite fast (up to 20 MHz), can be run on batteries for a long time (if you care about your current consumption) and is easy to use program with the Arduino IDE. But there are limitations. You only get about 2K SRAM and 32K of program memory. That is enough for devices that only connect to a few sensors, driving a few motors, etc. But it’s not enough for more complex projects.
My DIY Home Automation Network needs a hub, that acts as a bridge between the Internet and the sensor nodes. Sensor Nodes are using nRF24L01+ Radio Modules. The Hub also hosts such a radio module, but has to send the signals in to the cloud. Although I wanted to have nice devices in the end I tried an Arduino Yun as a hub. The hub does not have to be very pretty as it will be placed in a small room that is not exposed. A small enclosure will do it. Arduino Yun is a great device that hosts both an Arduino MCU and a full-fledged Linux on the same device, connected with a bridge. Using the bridge you can run shell commands from the Arduino MCU on the Linux side and receive the results. You do not have to build a whole HTTP-client, as Linux already has one. I have written a small tutorial about that: Running Node.js on Arduino Yun.
All of that worked fine – in the lab. Using the sensor networks in the wild (well, in my house), I found it very difficult to debug the system. In order to save power the nodes do not have any LEDs, Display, whatever. I added some LEDs to the Arduino Yun that showed it’s state and if sensor data came in. But all in all it did not really help. I found sensor data in the cloud, but not from all nodes. And I could not really see the routing in the nRF24L01+ network. Attaching displays to the sensor nodes has not been an option due to power restrictions. I had to add a display to the hub. That would give me the option of adding some sort of user interface to it. But Arduino Yun only has 2K SRAM, and adding a display and it’s quite large driver code I ended up with not enough SRAM left. I could optimize everything so it perhaps would fit, but I would not have any room to add a UI to the hub later on. I have been quite disappointed about this limitation. I think the Yun should have built with a beefier Arduino-MCU. It should be possible to drive a display trough the bridge from the Linux side, but that would be way to slow. Although I really liked the idea of the Yun, it did not fit my needs.
Teensy is here to help
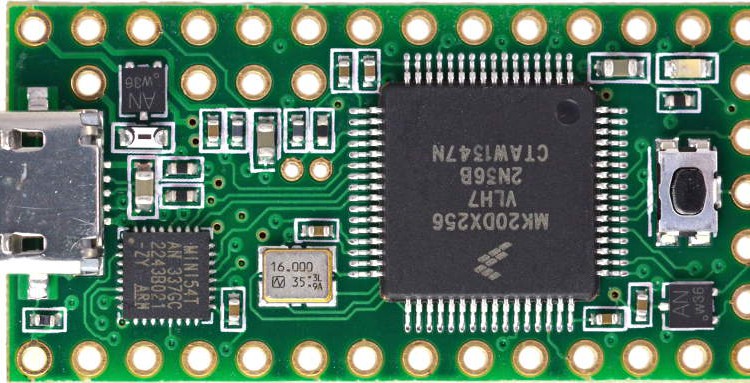
Searching for an Arduino Compatible small device Google with tell you to have a closer look at: Teensy. Teensy is just an amazing piece of hardware, created by Paul J Stoffregen. Paul did an amazing job with Teensy, especially the latest version 3.1. Teensy ist very small. If you find an Arduino Nano or Micro Pro small, you will be amazed how small Teensy really is. And it’s very, very powerful. Teensy features an ARM Cortext MPU with 64 KB SRAM and 256 KB Program memory. That is a lot of space and enough to do a lot of cool stuff. What I really love about the Teensy is how bootloading it is solved. I had a few issues with programming Arduinos. Teensy features a tiny uploader software, that is either triggered by the Arduino IDE or by pressing the reset button on the device. And uploading new code always worked. I really love that. Just install the Teensy Hardware Plugin in your Arduino IDE 1.0.x (it does not support 1.5.x at the moment) and you are good to go.


