Printrbot Simple 2016 CommStack explained

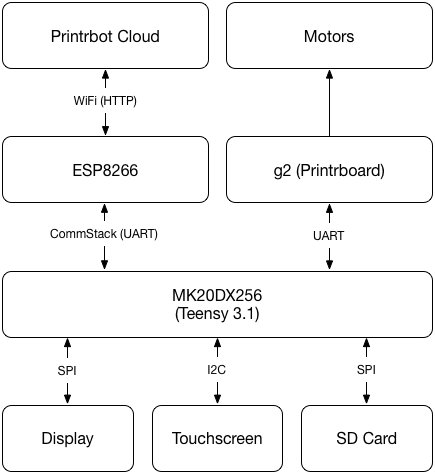
This is series 3 of the Printrbot Simple Behind the Scenes report. In this post I will go into detail what CommStack is and why we developed it. As you know Printrhub has two MCUs: ESP8266 and Teensy 3.1. There are more details on the hardware design here, but to make it short hier is a block diagram of the setup to get us started:

printrhub_block_diagram

As you can see, MK20DX256 (our main processor) has quite a lot to do. And if you have read the document describing the display system you know, that we cannot block the main loop any time. Because that would mean that the display is unresponsive or worst, the printer does not get new commands and stops the print.

Let’s think about a usage scenario and translate that to tasks of work being done by this system: Starting a print.

If you start a print, you select the print job on the display. MK20 will ask for touches in its main loop and reflects those interactions on the screen. When you press the PRINT button, MK20 checks SD card to see if that file is already downloaded (available on the SD card). If it’s not, MK20 has to ask ESP to download the file. ESP downloads the file and sends the data to MK20 which in turn writes the data to the SD card.

Remember, we don’t want to block the main loop. We need to do that in an asynchronous way. What I mean with that is that we must split that into very small pieces and execute them one after the other in the main loop, but in between we give control back to other parts of the system.

(more…)

Read More

Printrbot Simple 2016 Display System explained

Over the past few months I have developed the LCD component of the new Printrbot Simple 2016. In this post I want to explain how the display system works. It makes sense you read the Behind the Scenes report of building the Simple 2016 first, as that gives you some context to what I am talking about here.

Early on we decided to use a display with the ILI9341 display driver chip as there is a very fast display driver available. We also decided to use the 2.8 inch display as this had the best fit in the new Simple model. We also decided to use the FT6206 touch screen although this can be easily exchanged as most touch screens are connected via I2C and the protocol is very simple to implement.

Adafruit has exactly this display as a break out board available. PJRC also sells the same display, but with a different touch controller. However, it’s not an issue to adept our code to another touch controller. And, of course there are display modules available at eBay. Just make sure your display has the ILI9341 display driver chip installed. Although our display system is very flexible you get best results if you choose a 320×240 pixel display to get quick results.

How displays work

Displays have a memory area and small pixels are connected to this memory (not in a circuit kind of way but you get the idea). When you change the bytes in that memory area the display reflects that. You modify this memory area using SPI to write data in specific memory regions. That takes time. And as the display immediately reflects any changes you can see the display building up the final user interface. Worst, you cannot just first fill a rectangle and then draw some text on it, as it would result in flickering. Animation is practically impossible although Paul did a very good job of making it as fast as possible.

There is a very easy way of fixing that: a back buffer. You store a memory area in your MCU that mimics that memory area of the display. You make changes there, you can overwrite data multiple times. And when everything is composed you send the whole area to the display. This does not allow for fast animations, too. But you get a nice, polished look and feel. But, Teensy does not have enough memory to store a back buffer!

(more…)

Read More

Xcode quick tip: Copy failed during export or uploading to App Store

I have been working quite some time on version 1.3 of Copper, our Mac EDA application. Check it out if you didn’t know yet. This version brings the ability to import your own STEP models of parts to create wonderful 3D models of your PCB. And this feature also added a lot of (partly external) code to my project.

After archiving the project I wanted to upload it to the App Store. So I went in the Organizer of Xcode, selected the newly created archive and clicked on “Upload to App Store”. But, export failed. I got a strange “Copy failed” error with a hint to some logs. Reading these logs is hard. As I added various Frameworks and external libraries to my application I thought it must have been something to do with that. So, for many months I tried again and again, I ripped my project apart but I never really got this issue solved.

Looking at the logs I noticed that it points out:

...
2016-11-16 09:53:45 +0000 652253 bytes for ./Contents/Resources/woodTexture2.jpg
2016-11-16 09:53:45 +0000 /usr/bin/ditto exited with 1
2016-11-16 09:53:46 +0000 [MT] Canceled distribution assistant

(more…)

Read More