My DIY-Wireless-Home-Automation-System requires various nodes to be placed around our house. Having kids and a wife, there is no way around building nice looking enclosing for my stuff. So I decided to invest into a 3D printer. It took me some time browsing the web to find what I was looking for. I really want good quality prints. And as my primary interest is electronics and not 3D printing, I wanted a machine that runs out of the box and does not need a lot of preparation before each print and various reprints until you have printed a piece that is ok.
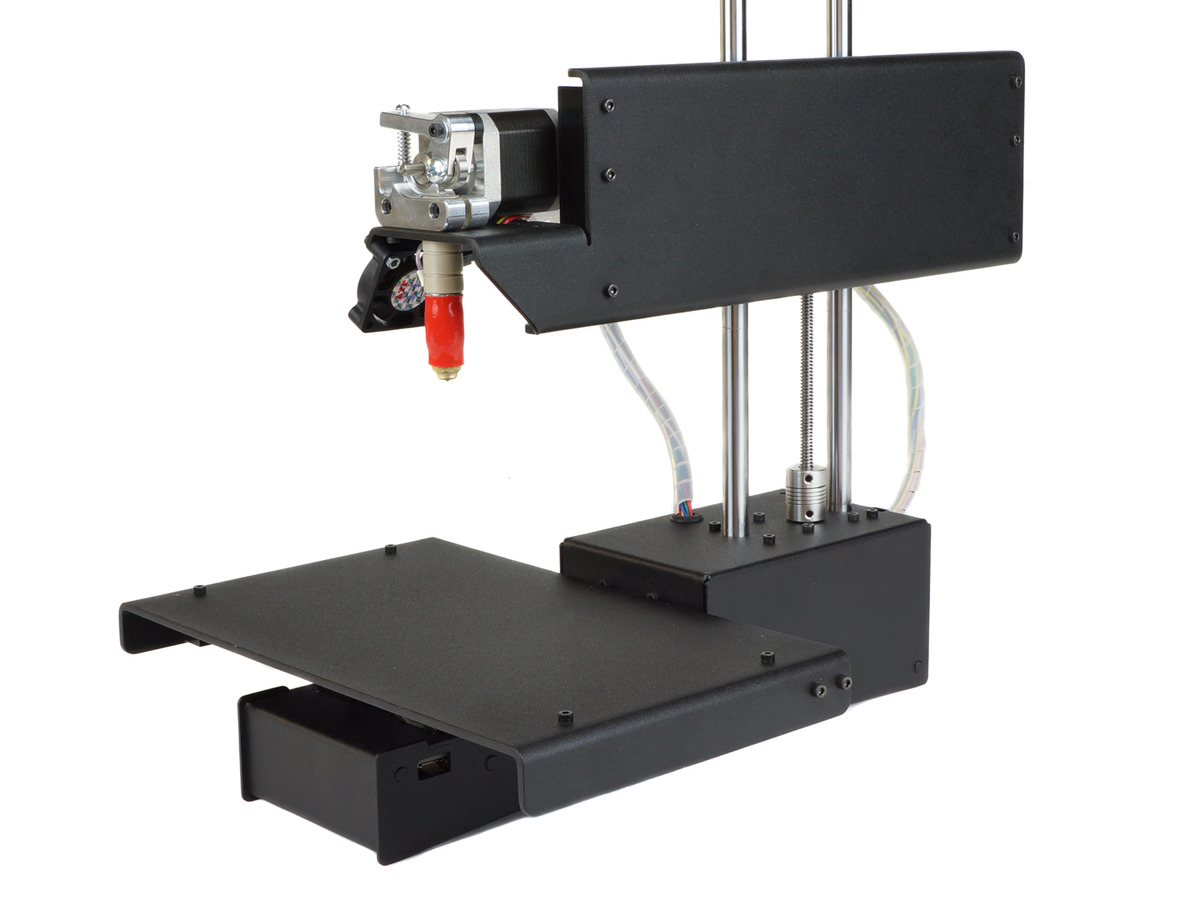
As I did not want to spent too much money on a 3D printer I bought a Printrbot Simple Metal. As you browse the web you read a lot of very good things about this tiny (well, not really) machine. And I tell you the same. This machine is really very, very good. But there is a major fault with it: It’s not plug and play. But it’s so close! The software is good, and the hardware is very, very good, too. Even the Getting Started Guides on Printrbots Website is quite good I think. But there are some minor Bugs that prevent a hassle free start – well in my case, and as you are reading this I think you have problems, too.
I must admit that I purchased the assembled one. If you are having problems your job is harder as you could have built something wrong. Either way, perhaps you did everything correctly and now you are running into the same issues that you will have even with an assembled one.
What I really do not understand is that there are so many comments and forum posts with people running in the same problems over and over and it all comes down to faulty getting started guides and other minor documentation bugs. And they have not been updated till now. But I am here to help!
Here is my own getting started guide. But I will not write down every little step. Instead I will give links and will comment on the bugs, issues and solutions I have found while following the official guides.
Let’s get started:
1. Unboxing your assembled Printrbot Simple Metal
The official Unboxing Guide on Printrbots website has everything you need. I am living in Germany and ordered my printer in the UK (RoboSavy). At first I wanted to use a power cord adapter from UK to Germany. Instead I just used the power cable from my old PS3. Just follow the guide: Unboxing Your Assembled Printrbot Simple.
This video explains how to connect power, connecting the computer and first moves. Use the video to connect your printer to your computer, but don’t do anything else explained in this video (first moves), as that will need software installation and setup, described in the next section.
Now carefully turn the printer around so you can have a look on the bottom of the printer. There you will see the Electronics. Try to find out what revision your Printrboard is. Just follow Step 1 of the official Update-Firmware Guide to find out.
2. Installing the software
The next step is to install the software. I must admit that I am using a Mac. There is no driver installation necessary and as I have not been working with Windows since Windows XP I cannot really help you with that.
You will need to download Repetier Host at this link: Repetier Host (Mac/Linux/Windows). The Mac-Version has version number at 0.56 at time of this writing, the windows and Linux version have 1.04. I don’t know why these version numbers are not the same for each platform, but the Mac version works great.
I suggest you donate a few bucks so they can improve the software – the software is great, but there is a lot to do to really get a very good out of the box experience.
3. Installing the drivers (Windows only, skip on Mac and Linux)
If you are using Windows, you will need to install drivers. Mac and Linux users just jump over to 2.5. Why are you using windows? Installing drivers for each device is so … well … boring. Don’t know. I leave you with your windows driver troubles alone.
Just follow the links provided at Step 3 of Printrbots Getting Started Guide. But come back as soon as you have installed the drivers. Don’t follow Step 4 in the official guide as they have left something I think.
4. Setting up Repetier Host for Printrbot Simple Metal
Repetier Host is the software that does it all: It allows you to import STL-Files (that is the file format for 3D models ready for printing, it’s like 3DS, Collada, etc), arrange them on the (virtual) printer bed, let’s you slice them to G-Code and in the end, sends the G-Code to the printer and does a nice job of rendering the current progress. Like most GUI-Open-Source-Software it’s a very powerful software, but it’s a bit complicated to use. In this special case, the software contains of different open source software, bundled into one package. That means, that configuration parameters like the size of your print bed must be set in different parts of the software. That is a big mess and produces a lot of confusion, but I am here to help.
| 1 | After starting the software for the first time you will have to setup your printer. As said before this is a two-step-process, as Repetier Hosts hosts another piece of important software that works mostly independently and therefore has its own settings. Click the button “Printer Settings” in the toolbar, marked with a blue rectangle in this Screenshot. The printer settings dialog will now open. In this dialog we will set the basic parameters for the USB-Connection, the print bed size (for placing the virtual objects). | 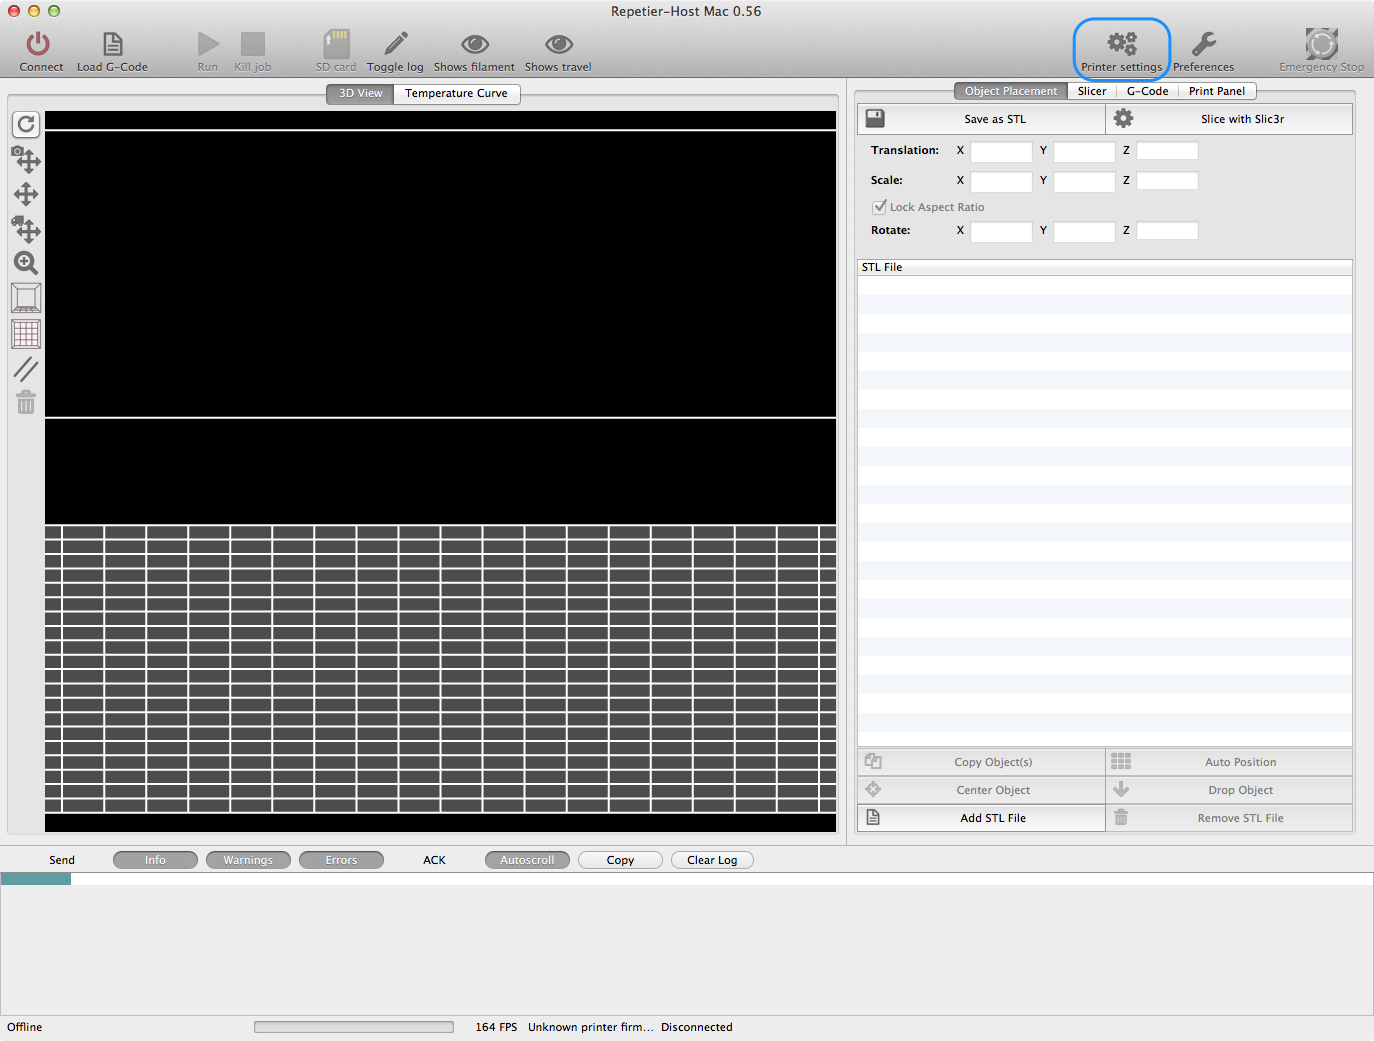 |
| 2 | You have to choose the correct Port (on the Mac - don't know if necessary on other platforms). These entries will be there all the time, if your printer is connected or not:
There will hopefully be some more strange entries in it. Your printer will be something like /tty/usbmodel1401. The best way to find out is to just connect the printer to your computer and choose the first entry after the standard entries. If nothing is shown make sure your printer is connected to your computer and has power (there should be a green light diffusing out of the bottom of the printer). | 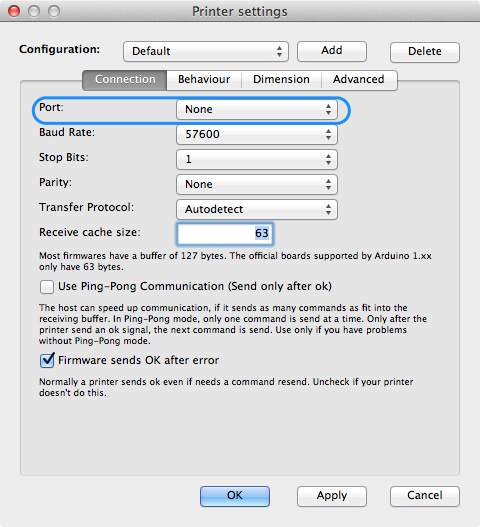 |
| 3 | Switch to "Dimension" and enter the print bed size. The print area of the Printrbot Simple Metal is 6x6x6 inch, that is 152x152x152 in mm. Enter the values as shown in the screenshot to the right. If you are living in the US you will likely have to enter 6 instead of 152, but I am not quite sure. | 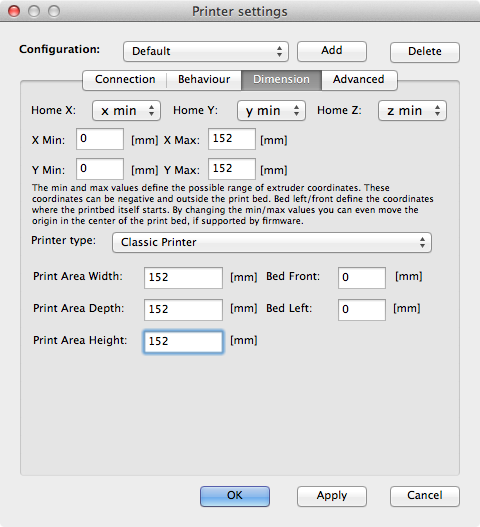 |
| 4 | Just click OK to save the settings. We have setup Repetier Host. In the next step we will have to setup another part of Repetier Host, called Slic3r. |
5. Setting up Slic3r
As said before Repetier Host is the host for various external programs that are embedded into the Repetier User Interface as best possible. Slic3r is the software that takes a 3D object described with points and triangles (the STL-File) and generates G-Code of it. G-Code is a very simple language but generates complex codes. G-Code tells the printer step-by-step what to do. For example: Move 5 mm to the right, Move 5 mm to the left, Heat the extruder, Extract 1 mm of material, etc… That is a very complex task, and although we have to mess around with G-Code a bit in the next steps, we really do not need to understand that at the moment. But it is very important to enter G-Code exactly. The machine just executes G-Code, there is not much intelligence in the machine. So be very carefully when entering G-Code directly to the machine!
Follow the official guide to set up Slic3r with a configuration file: 3. Loading a Configuration File and Printing an STL On Your Printrbot Simple. But do not print something yet, as we have not setup the printer! Leave the guide after you have set up Slic3r – so stop with Step 5 and come back here. We will print something in the next minutes!
In Printrbots official guide setting up Slic3r is done in Step 3, as Slic3r is only necessary when converting STL to G-Code. In the official Step-2-Guide (Setting up Auto-Leveling and first print) only G-Code is used, so there is no need to set up Slic3r. But I think it’s good to have the software setup. So when something goes wrong later you will not have to check if the configuration of the software is correct.
6. Updating the Firmware
If you have followed my guide step by step you will know what Revision your Printrboard is (see 1). If you have bought an assembled one a few days/weeks ago, I am quite sure you have Rev F4. At time of this writing there is just one firmware and you have it installed: No firmware update is necessary to get your printer up and running! My printer works very good with the firmware that came on F4.
Firmware-Updates on these devices is a lot more complex than just installing a Software-Package with typical consumer products. Even if you read it in every forum: Don’t update your firmware just now. Your printer will work! If you have problems I am very sure that it’s not the firmware!
If you are running a board with Rev D or earlier it might be different. But I have no experience with these, so please follow this guide to check if a firmware is available and how to write it on your board.
7. Setting Up Your Auto-Leveling Probe and Your First Print
Please read carefully and follow the guide. There may be some buttons in the software and I know you are anxious to get your printer up and running. But it is really very, very important to get every step right. If you follow the guide you will have your first print in 45 minutes. If you do anything in between you will lose hours, scratched boards, and a discalibrated printer. So please, just follow my guide. Before doing anything, you should read the documentation one or two times, and watch the video.
7.1 Watch the video Calibrating Your Auto Leveling Probe
This video gives a very good introduction in Auto Leveling and setting it up. Just watch it! In the video a few things are missing, so just watch it to get a sense of what we will do in a few minutes. There is a better step-by-step guide with better Screenshots than in this video!
7.2 Calibrating your printer
Well, now you should know what you will have to do now. We will calibrate our Z-Axis. That is very important, as it’s crucial that the distance between the print nozzle and the bed is correct. If you buy an assembled printer, everything should have been setup correctly, but it’s your turn to optimize it to its full potential.
We will now follow the official guide offered by Printrbot. In this official guide the fan shroud should be printed! But be careful. The provided G-Code in the fan shroud has a bug which will get your printer into trouble. That bug has been the reason I had searched the web, thought of firmware updates, etc.I lost hours tracing a bug that is not there. It’s just in the G-Code of that damn file! The provided fan shroud G-Code file is for the Printrbot Simple (Wood) and not for the Metal. The Metal seems to have the Y-Axis inverted. So when you run the G-Code on the metal (like I did), your printer will move far beyond the farthest Y-Axis position, causing a belt jamming, awful noises and you think you have killed your printer before it even has printed one mm! I just plugged power as soon as I could and my printer is working great. But I don’t want you to hear these noises!
To get you up and running I suggest you use the Calibration Cube G-Code file which works great. You can download it here or if you don’t trust my deep file links, follow this link to Printrbots official site and download the file from there. It’s called FirstCube.g.
A few tips before you get started:
- Read each step carefully before you do anything. Read it again. Then follow the steps and make sure you never miss one. That is very important.
-
The printer always starts by printing an outline of the actual print. This outline is printed so extrusion works when it come to printing the part. The printer will run 3 outlines. It sometimes actually prints at the last outline. So it’s ok if nothing is visible on the first one or two rounds.
OK. Let’s get started printing. Follow the guide provided by Printrbot. But do not use the Shrouded Fan File but the FirstCube. From the video above you should get a feel how the cube should look like. In the official Troubleshooting Prints Guide there are a lot of pictures of good and bad prints.
Have fun: Setting Up Your Auto-Leveling Probe and Your First Print
8. Slicing and printing STL-Files
Always printing the same cube is boring. The next print should be the Fan Shroud. But, as said before: You be careful with the provided G-Code file provided by Printrbot.com. Download the STL-File and slice it yourself. As you have a fully configured Slic3r configuration already installed (Step 5 of this guide) you can start printing STL-Files right away.
A few tips before we are getting into that:
- Don’t get confused by the Print Panel shows the old object, although you have placed new objects in Object Placement. Print Panel will show the new object once you have started the job!
View this guide past Step 5 to learn how to lay down an object from a STL-file on your virtual print bed, how to generate G-Code using Slic3r and how to start the print.
Loading a Configuration File and Printing an STL On Your Printrbot Simple
9. Congratulations
If you had a bit of luck, and my guide did what I intended it to do, then you now have a fully working printer. But there a some things left. You will need a spool holder. And you should have something to dampen frequencies and noise of the printer. And I tell you something: All of these can be printed on your new Printrbot Simple Metal :-).
Here are a few things that I printed and work great:
- Printrbot Simple Filament Spool Holder
- ExtruderKnob for Printrbot Simple Metal
- Printrbot Simple Feet
Have fun with your Printrbot Simple Metal!


Awesome guide 🙂
I was going to make one of my own, but yours is very comprehensive 🙂
Also, thanks for the resources to print out. I printed out different feet and never even saw the extruder knob 🙂
It’s 5 months later and now they suggest using Cura for everything now. I’ll check our your step-by-step guide for Repetier and Slic3r. Now that I use Cura, the other two seem really weird.
This excellent website certainly has all of the information I wanted about this subject and didn’t know who to ask.
Can you please let me know that whether the printer can autodetect its filament types, nozzle diameter, or other parameters or when a user request for its properties , the printer will response with its properties. No manual inputs required.